Posted in Uncategorized

Mini Portable Washing Machine Review

I am finally ready to share my mini portable washing machine review! This review is specifically for the Costway Twin Tub Portable Washing Machine that was purchased a few months ago. I have had three months to put it to the test. So, I am able to share both the pros and the cons with you in this mini portable washing machine review. I purchased a good mini portable clothes dryer, so you can check out the review for that as well.

If you are in the market for a mini portable washing machine, you probably already know that it can be really hard to decide which machine to get with so many mixed reviews. Since purchasing and using Costway Twin Tub Portable Washing Machine, I have become much more impressed with the single tub Panda Portable Washing Machine and the Black & Decker Portable Washing Machine features and functions. But for now, let’s get to the Costway mini portable washing machine review!

Mini Portable Washing Machine Review

AT A GLANCE


PROS:

  • Lightweight
  • No Professional Install Required
  • Convenient
  • Highly Effective Dryer
  • Large Tub

CONS:

  • Water Flows By Gravity
  • Drain Hose Must Be Drained
  • Weight Restrictions
Mini Portable Washing Machine Review

PROS


The fact that this washing machine is light weight and does not require a sink attachment (which is a good or bad thing depending on your needs) are the two main pros for this mini portable washing machine when compared with the other recommended washing machines.

1. Lightweight

If you are concerned about the weight of the machine, the twin tub machines are light enough for one person to move around when it is empty. Therefore, once it arrives, you should not have too much trouble getting it out of the box and placing it where you want it to go. Or moving it to store somewhere else when it is not in use. The single tub machines are heavier.

2. No Professional Install Required

A traditional washing machine requires a special electrical outlet, a water supply, and a drain. On the other hand, with a mini portable washing machine like the one I am reviewing there are no special installation requirements. It is about as simple as it gets. You can plug it into a regular electrical outlet, add water any way you want, and drain it wherever you want. The recommended single tub washers require a faucet attachment.

3. Convenient

Once you find a setup that works, a mini portable washing machine can be very convenient for a single person living in an apartment or home, a parent with an infant or toddler, a college kid living in a dormitory, or even a self-sufficient elderly person. Either way, if you do not want to drag your clothes to the laundry mat, a mini portable washing machine of some sort may be a good option for you.

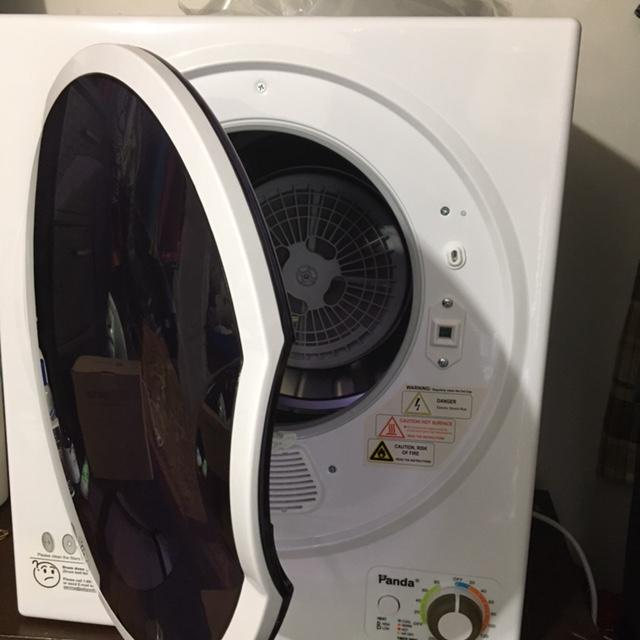
4. Highly Effective Dryer

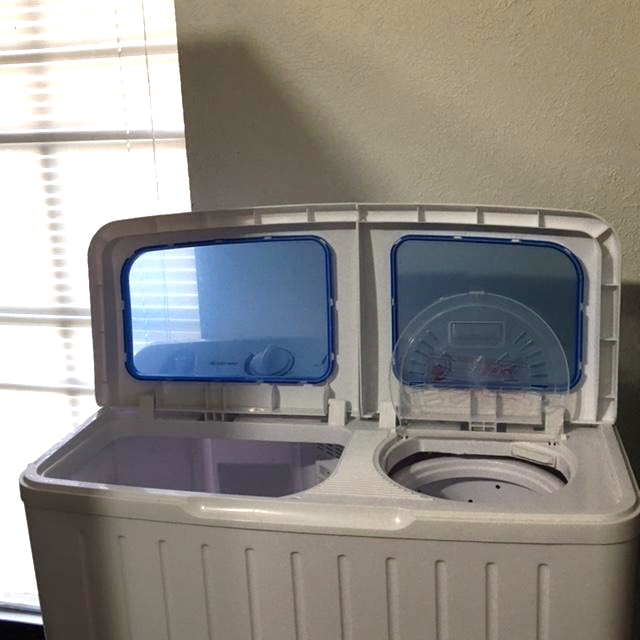
With a twin tub mini portable washing machine (like the one shown in the pictures), the clothes are washed and rinsed on one side of the machine and then transferred to the dryer or spinner (as it is sometimes called) to remove the excess water. The best feature on this mini portable washing machine is the very effective dryer or spinner. While it is smaller in size, it works really well! If you are also planning to use or purchase a mini portable clothes dryer, you want the clothes to be as dry as possible. The single tub mini portable washing machine can also dry the clothes really well before sticking them in an actual clothes dryer.

6. Large Wash Tub

You may be surprised by the size of the mini portable washing machine tub. It was larger than expected. Therefore, larger lightweight items like sheets and small throw blankets can be easily washed.


CONS


There are three main cons to this type of mini portable washing machine. So, let’s review each of them.

#1 – Water Flows In/Out By Means of Gravity

Likely to keep the cost and weight of the machine low, there are no compressors or pumps to get the water in and out of the washing machine. The water flows in and out of the mini portable washing machines with the help of gravity.

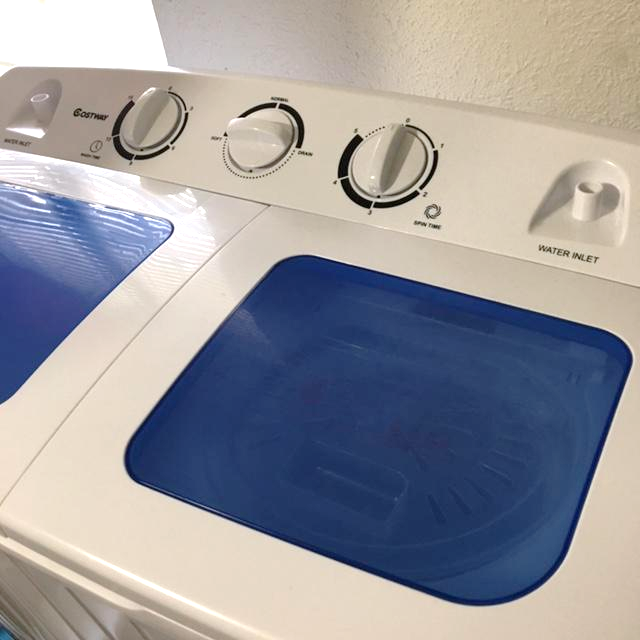
To get the water IN the machine, you can manually add water directly to the mini washing machine tub using a shower hose, kitchen sink hose, outside water hose, or even a bucket of clean water. If you live in a house, another option is to discreetly and easily use your mini portable washing machine on a back porch. Carefully fill the machine with a garden hose and then drain it in the grass. Otherwise, you can set up an automatic water source inside your house or apartment that is located above the height of the mini washing machine. There is a small hose provided that can be attached to a water inlet…but it’s easier to just add it directly to the tub. The Panda Portable Washing Machine and the Black & Decker Portable Washing Machine are sold with a sink attachment that can be much more convenient if it fits your sink.

Mini Portable Washing Machine Review

To get the water OUT of the machine, it will need to be elevated at least 4-6 inches off the ground to completely drain the hose. I have read reviews from some people that drain the water into their tub or shower. And I have seen pictures of this mini portable washing machine sitting on a small bathroom countertop to drain the water in the sink. Whatever you decide, make sure the mini portable washing machine is located wherever you will be draining it before you add the water. Otherwise, you may need a cart on wheels to transport it once it has been filled with water.

This is the main factor that generates negative reviews from people since it can be rather frustrating when the water flowing in/out only by gravity being a surprise. Since your living space and options for the water supplied to and from the washing machine will be different, think about how and where you can locate the machine to effectively get the water in and out of the machine. This is NOT the case with the Panda Portable Washing Machine and the Black & Decker Portable Washing Machine. They both drain with the aid of an internal pump. So, the washing machine can sit lower than the drain hose.

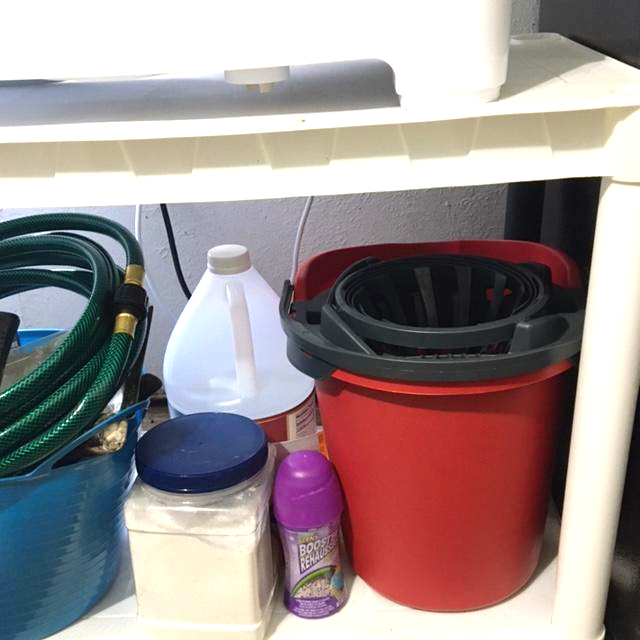
After some trial and error, I was able to locate my mini portable washing machine in a first-floor bedroom next to a large window. There happens to be a water hose located just outside the window, so I use it to quickly and easily fill the washing machine. Then, to completely drain the hose outside, it stays sitting on a sturdy plastic storage shelf as shown in the picture above to keep the drain hose above the height of the windowsill.

Mini Portable Washing Machine Review

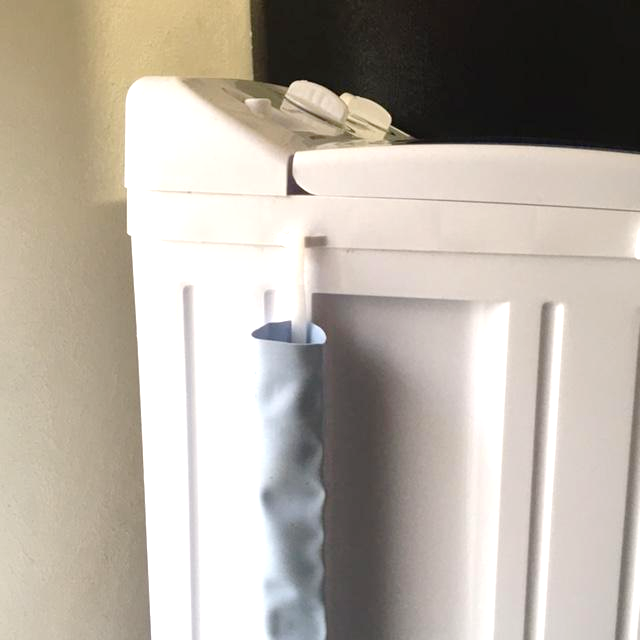
#2 – Drain Hose Must Be Emptied

I learned the hard way that the drain hose must be emptied completely after each use. If you allow any water to accumulate and sit in the hose, the weight of the water sitting in the hose may cause it to pull, tear, and spring a leak. There are no replacement hoses for this washing machine. So, I have since covered the drain hose with a pool backwash hose & clamp. This pool drain sleeve has been working well, however, you will still need to keep the drain hose emptied.

#3 Weight Limits

Just as you would not stuff a huge load of clothes in a small washing machine at the laundry mat, you do not want to overload your mini portable washing machine. They all come with stated weight limits that you will have to follow. However, you can wash a relatively large load of clothes that are all lightweight like pjs, t-shirts, face towels, and underwear and then spin them dry in multiple loads. Heavier items like large drying towels, small blankets, jeans, sweaters, or jackets can be washed separately or with a much smaller load to stay within the weight limit.

In Summary

If you need a lightweight and inexpensive mini portable washing machine that requires no faucet attachment, then the Costway Mini Portable Washing Machine may be a good option for you. If you intend to get a mini portable clothes dryer as well, be sure to check out the review. This concludes the mini portable washing machine review.

Posted in Uncategorized

Mini Portable Clothes Dryer Review

This mini portable clothes dryer is the perfect match for a mini portable washing machine. I say this because the mini portable washing machine (1) dries the clothes really well during the spinning phase and (2) also requires a smaller load. Therefore, your clothes will be ready to dry in a mini portable clothes dryer. Like the mini portable washing machines, the reviews are often mixed. Some claim to love it while others may claim to not love it. So, in the end, you just get sick of reading the reviews and just buy one and hope it works. Well, with this mini portable clothes dryer review, I hope to bridge the gap between why some love it and why some may not.

Mini Portable Clothes Dryer

This portable mini clothes dryer review is specifically for the Panda 110V Electric Portable Compact Laundry Clothes Dryer, 1.5 cu.ft with Stainless Steel Drum. But you can purchase the recommended Panda Washer + Panda Clothes Dryer as a set.

1. Dry, Wrinkle-Free Clothes

This mini portable clothes dryer can dry your clothes well. Since it is a small clothes dryer, it will take a little longer for your clothes to dry. But this depends on how wet your clothes are to begin with. Dripping wet clothes will take forever to dry. So, a mini portable clothes dryer works best when your clothes are as dry as possible before placing them in the dryer. As mentioned, a mini portable washing machine removes the excess water from clothes really well. So, it makes drying your clothes in a mini dryer much easier.

The dryer comes with four temperature settings – air dry, cool, warm, and hot. However, you will use only the hottest setting to dry your clothes. When drying clothes, I periodically turn the dial back to the hottest setting because the dial will slowly creep to a cooler setting as the clothes start to dry.

2. No Excessive Heat Generated In The Room

This mini portable clothes dryer does not generate an excessive amount of heat in the room. However, it is a heat producing dryer. Therefore, depending on where you live, it may warm your room up noticeably during the warm summer months. I purchased this mini portable clothes dryer just over two months ago when it was still really hot and humid in Southeast Texas. So, with no A/C running in that room, it was uncomfortably warm (especially with the dryer venting inside a already humid room). But it does not make the room feel as warm as when you turn on the oven on a hot summer day. In the winter, it produces just enough heat to take the chill out of a small room with no heater when it is moderately cold out.

3. Pleasantly Compact

The size of this mini portable clothes dryer is just right for my space. It is shaped like a box. However, once you attach the vent on the backside of the dryer, it will take up a little more space.

4. Can Be Wall Mounted

The Panda Mini Portable Clothes Dryer comes with brackets for you to mount it to the wall. So, this can be another space saving option.

5. Operates Quietly

So far, this mini portable clothes dryer operates quietly when there is nothing metal hitting the drum. Otherwise, it will sound similar to a traditional dryer when something hard like buttons, zippers, or snaps hit the stainless steel drum.

6. Venting Outside Is Optional

Typically, a dryer is installed with an opening in the wall for the dryer vent to be directed outside. If you live in a really dry area, this mini portable clothes dryer can be used like a humidifier in the cold dry air of winter. Otherwise, if you live in a really humid area, you may opt to have the dryer vented outside in the hot humid air of summer. Fortunately, a dryer vent kit comes with the Panda Mini Portable Clothes Dryer. So, you can have a vent with tubing when you need it or want it.

In Summary

As stated, this mini portable clothes dryer review is specifically for the Panda 110V Electric Portable Clothes Dryer, 1.5 cu.ft. with a Stainless Steel Drum. If you are also planning to purchase a mini washing machine, you can get the recommended Panda Washer + Panda Clothes Dryer as a set. If you are still undecided about which washing machine to get, be sure to read the pros and the cons provided in this mini portable washing machine review before making a purchase. I hope you find this mini portable clothes dryer review helpful.

Posted in Uncategorized

Portable Camping Shower | Review

For the past couple of weeks, I have been using a portable camping shower kit that was purchased. So, I decided it is time to write the review. Besides camping, it can also come in handy around the house in semi-emergency situations.

  • When there is a boil water notice, once the water is cool enough, this portable camping shower kit can be conveniently used to take a warm shower inside the home. You can avoid trying to fill an entire bathtub of water.
  • In the winter (or summer) months, it may also be convenient to have and use if you run into any issues with the supply of hot water. In this case, you can heat some of the water and add it to your portable camping shower water supply to take a pleasantly warm shower.
  • If you are using a portable washing machine, it may also come in very handy with that as well. One lady said she uses her portable camping shower to fill what I am assuming to be an industrial sized coffee machine. In this way, a portable camping shower kit can spare an individual from lifting gallons of water.
Portable Camping Shower Review

1. The Shower

To my surprise, the shower head on this portable camping shower kit is very comparable to a traditional shower head! It does not provide you with the expected weak trickle of water, it provides you with an actual shower stream. Just be aware that the shower head has an “off” position. When the round flat part of the shower head is parallel to the hose, it is in the “off” position. When you are ready to use the shower, the round flat part of the shower head must be place at an angle for the water to flow. This is a detail that I overlooked for a while, but it is included in the instructions.

2. USB Charger

The battery is a rechargeable battery. It is recharged with a USB charger. Therefore, you do not have to keep buying batteries. I turn the battery on when I am ready to use the shower. After several uses, thus far the battery has not needed to be recharged.

Portable Camping Shower Review

3. Easy To Assemble & Use

This portable camping shower kit comes in a convenient lightweight carry bag. Therefore, it can be stored easily between camping trips. The instructions include easy to follow pictures for connecting the few parts that need to be attached together.

4. Extra Battery

This portable camping shower comes with not one battery, but two batteries! So, if you keep them both charged you should not encounter the unexpected dead battery when you are ready to take a shower.

5. Additional Extras

This kit comes with both a shower head and spray nozzle attachment. Therefore, when camping you can use the spray nozzle to clean the dishes, clean the different camping areas, bath the dog, or any other number of things. It too provides a really good stream of water! This portable camping shower kit also comes with both a hook and a suction cup in which to hang the shower head in your camping shower tent.

Portable Camping Shower Kit

6. Lightweight, But Durable

This shower kit is lightweight. However, all of the parts seem to be very durable.

In Summary

That is all for now! You can find a DIY body scrub to make and use on your next camping trip. Or perhaps one of the exfoliating DIY soap bars. If you have been considering a portable camping shower kit, this may be the one for you.

Posted in Uncategorized

Mini Notebook

This is another cute homemade mini notebook idea that is made with glue. Since this notebook is made with glue, you can add as many pages as you want. The mini notebook without glue limits the number of pages that you can add. So, if you want a professional looking notebook with more pages added, this mini notebook may be what you are looking for. You can use the notebook yourself or share with some of your friends, family members, or teachers. The homemade mini notebooks can make a really nice addition to gift bags or gift baskets. This is especially true with a convenient and easily changeable stencil design. Just find the stencil design(s) to fit whatever project you are working on.


What You Will Need


Step 1: Use a ruler to measure and a pencil to lightly mark the middle of a sheet of printer paper or card stock paper along the 8.5-inch side and 11-inch side. The middle of a standard sheet of paper should be 4.25-inches on the short side and 5.5-inches on the long side.

Step 2: Place 1 sheet of the card stock paper along with multiple sheets of the printer paper together to prepare for cutting. So, the marked piece of paper should be placed on top.

Step 3: Use the paper cutter to cut the small stack of papers in half using the marks made in the middle of the paper as your guide.

Mini Notebook

Step 4: Once cut, stack half of the papers together using one piece of the card stock paper for the front cover and another piece for the back of your mini notebook.

Step 5: Repeat step 4 with the second mini notebook.

Step 6: Stack the papers well so that the edge of the opening end of your notebook is even. Then, use paper clips to tightly secure the opposite end for gluing with the tacky glue.

Mini Notebook

Step 7: Once the tacky glue dries, you can use the masking tape to tape the glued edge as shown in the image below.

Mini Notebook

Step 8: Once you cut the tape and fold it over both sides, your mini notebook is basically done! Now you can add whatever stencil design that you want (if you have not already done so).

Standard Printer Paper (8.5 x 11 in)

When making a mini notebook, you can use standard printer paper for the main pages of your notebook. With a glued notebook, you are not as limited to the number of sheets of paper you can add. The edge of your notebook should stay even as long as you measure and cut the paper well.

Card Stock (8.5 x 11 in)

The card stock paper is a slightly thicker piece of paper that is often used for making cards. Since it is thicker than printer paper, it can be used to create the front and back cover for your mini notebook.

Pencil

A standard lead pencil with an eraser. can be used to mark the paper. Once you cut the notebook to size, you can use the eraser to remove any visible marks.

Ruler

To help keep the edges of your notebook smooth, a ruler should be used to measure the midway point along the 8.5-inch and the 11-inch side of the paper. Folding the paper into fours can result in your notebook having kind of jagged-looking edges.

Paper Cutter

Similarly, the paper cutter is needed (1) to create nice, clean, even edges and (2) to cut all of the pages to the exact same size (preferably all at once).

Tacky Glue

The tacky glue is used to glue one edge of the notebook together. You can apply the glue straight from the bottle or use a toothpick to apply the glue into any nooks and crannies that may have appeared as needed.

Masking Tape

You can use black masking tape or choose a color from a more colorful masking tape set.

Stencil

You can use any stencil that you like to design your mini notebook. Many are sold as themes or in sets. So, you will have a wide selection to choose from.

Map Pencils

In my opinion, map pencils are the easiest way to color a non-adhesive stencil. Otherwise, unless you are using a spray paint it will bleed just like markers bleed and smudge.

In Summary

This is another quick and easy craft idea that you, your family, or your friends can make and use. You can of course change the stencil design and add more colors to fit your taste. Either way, with a little creativity this mini notebook can be an excellent gift idea.

Posted in Homemade Kitchen Cleaner, Kitchen, Uncategorized

Homemade Pot and Pan Cleaner

This homemade pot and pan cleaner can be used for cleaning burnt and stained pots and pans. If you simply need a way to remove excess grease from your pot or pan, the homemade degreaser may be the page you want. This homemade kitchen cleaner can work wonders on old pots and pans or perhaps newer ones that has been burned with food. The real-life pot that is shown below had thick layers of burnt food stuck to the bottom of the pot. It was so burnt; I was thinking it needed to be placed in the garbage. But, to my surprise, this homemade pot and pan cleaner did the trick.

Ingredients

This homemade pot and pan cleaner can be prepared with a combination of (1) baking soda, (2) distilled vinegar, and ultimately (3) liquid dishwashing detergent.

1. Baking Soda

The baking soda is used to create a mild chemical reaction with the vinegar. You simply sprinkle some of it inside the pot or pan in the area of interest. Baking soda is also mildly abrasive. Therefore, once you get to step 3, you can add a small amount of baking soda with the dishwashing soap to help with the final step of cleaning your pot or pan.

2. Vinegar

Distilled vinegar is a popular mild acid that can be used around the home in a variety of ways. In most cases, it is not used to create a chemical reaction with one exception being when used as a DIY laundry detergent booster. The homemade pot and pan cleaner are another exception. It is used to intentionally create a mild chemical reaction with the baking soda. When you add the vinegar to the pot or pan that has baking soda in it, it will foam and break up the burnt food that is stuck to the pot. Afterwards, you can wear gloves to scrub the pot with a good scrubber. Or use a brush with a long handle to scrub the pot clean. Repeat step 1 and step 2 as needed before going to step 3.

3. Dishwashing Detergent

Once you have used the homemade pot and pan cleaner, you can discard the used baking soda and vinegar. Then, you can finish cleaning the pot with liquid dawn dish soap and water or liquid dawn dish soap, baking soda, and water.

In Summary

That is all for now. You can find more homemade kitchen cleaner use. In the meantime, I hope you are able to get your pots and pans clean with this simple homemade pot and pan cleaner!

Posted in Uncategorized

DIY Roach Repellent Spray

This all-natural DIY roach repellent spray can come in very handy at certain times of the year. Living in a really old house with extremely poor insulation, the big black tree cockroaches usually start making their debut this time of year. However, this year there has also been a sudden and drastic increase in the number of small roaches showing up. It has promptly gotten quite ridiculous for seemingly no apparent reason. So, I am trying to get on top of the situation today with this all-natural DIY roach repellent spray.

DIY Roach Repellent Spray

Since it is all-natural, you can make and use this DIY roach repellent spray a few different ways. I am using it to spray baseboards and wipe down kitchen countertops and tables etcetera. Therefore, no soap was added to the solution. To use it as a homemade roach killer that will be effective on the roaches themselves, some suggest adding a liquid dishwashing soap detergent.

Baseboards have been sprayed and countertops have been wiped. So, I am looking forward to seeing how well this DIY roach repellent spray works. If nothing else, it leaves your house smelling minty fresh. According to researchers, the smell of peppermint is a roach repellent that can actually kill roaches if they are exposed to it for a period of time. Interestingly, the very same peppermint essential oil smell is an invigorating, anxiety reducing therapeutic for humans. So, just the smell of this DIY roach repellent spray can at least make you feel better about having to run roaches out of your house.


DIY Roach Spray Recipe


1. Warm Water

Warm water is used to help the borax powders dissolve. Since it is a DIY roach repellent spray, regular faucet water can be used instead of distilled water.

2. Borax

Although very similar, borax is not to be confused with its cousin – boric acid. Borax is a common cleaning agent that is often added as one of the active ingredients in DIY laundry detergents as well. The boric acid is actually sold and used as an effective pesticide for getting rid of roaches and ants. So, if you made or make the homemade roach killer, you will see that either one can be used.

3. Peppermint Essential Oil

You can use any peppermint essential oil in this DIY roach repellent spray recipe. It does not have to be a food grade peppermint oil.

In Summary

That is all for now. Please like, share, and subscribe. If you need to use the spray, I hope you like this all-natural minty smelling DIY roach repellent spray as much as I do.

Sources:

Posted in Uncategorized

DIY Weed Killer

This homemade weed killer is a DIY weed killer recipe that works! When you start a garden, figuring out how to get rid of the weeds is just something that may come with the territory. However, this is NOT the recipe to use in a garden. This recipe is prepared with a vinegar solution that can disorient bees and other pollinating creatures that you need to pollinate the flowers in your garden. Therefore, this is a DIY weed killer to use in an area that does not need any kind of pollination.

I initially used this homemade weed killer underneath the benches used for my container gardening. The ground is covered in rocks that were placed down many years ago. When watering the plants and making sure they get the nutrients required for plant growth, it seems the weeds may be soaking it up too! I say this because they look like they are trying to take over.

DIY WEED KILLER

Since the rocks are directly adjacent to the main lawn, I did not want to chance using a permanent DIY weed killer that may accidently spread into the lawn. If it rains or I soak the ground too much, some of the weed killer may accidentally roll onto the lawn. If this does happen, the lawn will not be permanently ruined, pretty green grass will eventually start growing again. So, while this DIY weed killer is not a perfect solution for every situation, it does work and have its pros.

DIY WEED KILLER

Ingredients

This DIY weed killer is made with vinegar and dish detergent. I used distilled apple cider vinegar and liquid Dawn dish detergent. The first time, a small batch of the DIY weed killer was mixed in a cosmetic spray bottle. As a result, the mist was too fine to do a good job of saturating the area well. So, the second batch was mixed in a larger spray bottle to make saturating the weed covered area well. With all that said, do not skimp on getting a good spray bottle. A good spray bottle will make the process go much easier and the end result will be much better.

DIY WEED KILLER

DIY Weed Killer Recipe:

Preparation:

  1. Place the vinegar and dish detergent in a large spray bottle.
  2. Secure the sprayer on the bottle and shake well.

How To Use:

  • Spray the mixture on the area of interest using care to avoid spraying your lawn or any area with flowering plants.

In Summary

That’s all. I hope you like the homemade weed killer to use around your house. This is a really easy DIY weed killer that works!

Posted in DIY Mouthwash, Uncategorized

DIY Mouthwash (Rosemary Mint)

This rosemary mint flavored DIY mouthwash is another effective antibacterial mouthwash. The flavor of this mouthwash goes well with the rosemary mint tooth powder and the DIY oil pulling recipe with rosemary. Once you make your own mouthwash for the first time, you may keep making your own. It is a really quick and easy DIY mouthwash recipe. And what is more, it works just as well as the next mouthwash!

diy mouthwash

Ingredients

This rosemary mint flavored DIY mouthwash is prepared with distilled water, rosemary essential oil, peppermint essential oil, colorant, and sweetener.

1. Distilled Water

The DIY mouthwash is technically prepared with a popular preservative that many skin care companies use. However, you should still use distilled water. In this way, the mouthwash is started with a microbe free solution. Faucet water contains microbes and other stuff that you do not want to use to make your mouthwash and sit it on the counter. It is also a good idea to make relatively small batches of the mouthwash. The recipe is made for a travel-sized container that may still last a little longer than you would think.

2. Rosemary Essential Oil

Rosemary essential oil is an earthy smelling, potent antibacterial that can act like a preservative. Therefore, this DIY mouthwash can be used to easily freshen the breath and destroy cavity causing bacteria.

3. Peppermint Essential Oil

The peppermint essential oil is another antibacterial oil that is perfect for making mouthwash. With its minty cool taste, it complements the earthy smelling and tasting rosemary essential oil well.

4. Colorant

A tiny amount of liquid green food coloring is added to this rosemary mint DIY mouthwash. It is an optional ingredient, but it adds an authentic touch to this mouthwash recipe. An entire drop will be too much for the recipe below. Just touch the inside of the container with a dap of colorant. Then, when you shake the ingredients together, the mouthwash will turn a pretty light green color.

5. Sweetener

Since this is a mouthwash, you want to use an artificial sweetener to sweeten the taste of your mouthwash. Real sugar causes cavities and promotes bacterial growth. Therefore, the last thing you want to do is bath your teeth in sugary mouthwash. On the other hand, xylitol sweetener can be used to both sweeten and protect the teeth from cavity causing bacteria growth.

diy mouthwash

DIY Mouthwash Recipe:

How To Prepare:

  1. Place the distilled water in a clean container.
  2. Now add the essential oils, colorant, and sweetener.

How To Use:

  1. Shake the DIY mouthwash before each use.
  2. Then use the mouthwash in the same way you use a mouthwash from the store.
  3. Squish, gargle, and spit.

In Summary

If you like this mouthwash recipe, you may also like the DIY peppermint mouthwash. Otherwise, you may like another one of the DIY mouthwash recipes. In the meantime, I hope you can enjoy making and using this rosemary mint DIY mouthwash recipe.

Posted in Uncategorized

DIY Window Cleaner

This simple, highly effective DIY window cleaner will leave your windows squeaky clean with a streak free shine. Since it is made for outside window cleaning, it is a slightly soapy formula. Therefore, it contains some extra dirt and grime busting properties that can really clean outside windows well. However, this DIY window cleaner can also be used to wash inside windows that gets dirtier than your average window. For example, you can use this window cleaner on glass doors that get touched frequently by toddlers or pets. Otherwise, you can simply use the DIY mirror cleaner to clean both windows and mirrors. So, let’s get to the ingredients in this DIY window cleaner!

diy window cleaner

Ingredients

This DIY window cleaner is made with water, vinegar, alcohol, and dish detergent.

1. Water

You can use distilled water or clean tap water to mix the other ingredients into this DIY window cleaner. Distilled water is ideal if you intend to keep some left over to use the next time you clean your windows. However, warm water is recommended for an outside DIY window cleaner. The heat helps to loosen up dirt particles and anything else that may have landed on the windows.

2. Vinegar

Vinegar is an all-natural, mild, and safe weak acid. You can use white vinegar or apple cider vinegar. With acidic properties, it can quickly break down dirt or residue that may be on your windows.

3. Alcohol

The alcohol is what will give your windows a clean, streak-free shine. Therefore, a basic rubbing alcohol is added to this DIY window cleaner. The alcohol also contributes to the resulting fresh, clean scent.

4. Detergent

A concentrated dish detergent is also added to this DIY window cleaner. The detergent also breaks up dirt and grime that may be on your windows. And in this way, makes the window much easier to wipe clean.

DIY Window Cleaner

Preparation:

  1. Place the warm water in a spray bottle.
  2. Then add the vinegar, alcohol, and dish soap.
  3. Secure the spray nozzle on the bottle and shake well.

Instructions:

  1. Use the DIY window cleaner immediately while the solution is warm.
  2. Spray the window or windows of interest.
  3. Then use a cleaning cloth or squeegee to wipe the window clean.
  4. Repeat as needed for heavily soiled windows.

In Summary

This is another really effective DIY cleaning product! If you like this DIY, you may also like the DIY shower cleaner and DIY shower cleaner spray. They too work incredibly well. In the meantime, I hope you enjoy using this DIY window cleaner.

Photo Credit: Detergent mockup psd created by Xvect intern – www.freepik.com

Posted in Uncategorized

DIY Mirror Cleaner

This DIY mirror cleaner is a really nice homemade window cleaning recipe! You can use it to effectively clean mirrors as well as inside windows with minimal (if any) streaking. After cleaning my bathroom mirror with this recipe, I had to go back and really intentionally look for any streaks. So, it is definitely a comparable substitute for Windex leaving your mirror or window with essentially a streak free shine.

If you like this DIY mirror cleaner recipe, you may also be interested in the upcoming DIY window cleaner. The window cleaner is designed to clean outside windows or car windows that may become cover in heavier dirt or fingerprints. Therefore, it is a soapy solution. For now, let’s get to this simple DIY mirror cleaner recipe.

diy mirror cleaner

Ingredients

The DIY mirror cleaner recipe is prepared with a mixture of (1) vinegar, (2) water, (3) alcohol, and optional (4) coloring.

1. Vinegar

You can add apple cider vinegar or white vinegar to this DIY mirror cleaner mixture. Both will contribute to cleaning your mirrors well. As a mild acid, it can help break down any dirt or debris that may have landed on your mirror. If you intend to add a drop of color to this DIY mirror cleaner recipe to give it an authentic “window cleaner” color, the white vinegar will work best.

2. Water

Distilled water should be used in the recipe. This is especially true if you are making enough to use later. Distilled water has been prepared to remove water impurities that can shorten the life of your DIY mirror cleaner.

3. Alcohol

A simple rubbing alcohol is used in this DIY mirror cleaner. Alcohol evaporates quickly and easily, Therefore, it can help minimize the potential for any streaks on your mirror or window.

4. Coloring

The coloring is completely optional. However, it can add a nice touch to your collection of DIY cleaning products. This DIY mirror cleaner cleans just as well as a commercial product and it even smells like a commercial window cleaner. So, with a drop of blue food coloring your friends and family may not realize that this is a DIY mirror cleaner!

DIY Mirror Cleaner

This is a relatively small DIY mirror cleaner recipe. So, you can multiply the recipe as needed/wanted.

In Summary

This is another one of the simple DIY cleaning products that work! You may also like the DIY shower cleaner or the DIY shower cleaner spray. In the meantime, enjoy making and using the DIY mirror cleaner!

Photo Credit: Detergent mockup psd created by Xvect intern – www.freepik.com